Runs over Wi-Fi
Desk Status
Busy or available? Tell the room with a red and green desk signal.
BusyAvailableLights off
ESP32 + 2 LEDs + resistors
Try the app →Build my own
Visual Arduino programming with AI
Describe it. The AI Builder designs the logic and wiring. Run it on a real Arduino.
No account, no board: press Play in the live preview below ↓
Try the ESP32 light and sensor preview ↓
New to Arduino? Follow the first project guide
Prefer watching to clicking? About a minute: a sample project's blocks, wiring and app in the preview, then an ESP32 app on your phone.
All tutorials →BUILD THE DEVICE. DESIGN ITS APP.
Ready-made ESP32 projects. Each includes editable logic, wiring instructions and a phone-sized app you can share and save to your home screen. The Desk Mood Light runs in the preview for now: its RGB LED does not run over Wi-Fi yet.
Busy or available? Tell the room with a red and green desk signal.
ESP32 + 2 LEDs + resistors
Try the app →Build my ownA 25-minute focus session, a 5-minute break, and a light to mark the change.
ESP32 + LED + resistor
Try the app →Build my ownWarm, cool and evening scenes for a small RGB light on your desk.
ESP32 + RGB LED + resistors
Try the app →Build my ownDemos are simulated. Real devices need initial USB setup, Wi-Fi and internet access. Keep the app open for live control and timers. Shared apps follow your project permissions; physical devices remain private to their owners.
ESP32 / PLUG IN ONCE, THEN WIRELESS
A button in your browser. A light across the room. Start with the ESP32 Wi-Fi Lamp, connect your board once over USB, then run your Logic and App controls over Wi-Fi.
ESP32 smart home projects · Control an ESP32 from your phone · Wi-Fi LED tutorial
No sign-up or board needed for this preview. Sign in to save the lamp project.
Real Wi-Fi control needs a supported ESP32, initial USB setup, and internet access for the relay.
Desk light Off
Interactive preview. No hardware is connected.
Try the switch or dial, then build your own controls.
Design on the canvas, read the real Arduino code beside it, run it on a real board over USB, and build with friends — without leaving the browser
Live preview · no account, no board
This is the ArduinoStudio editor in miniature, running a real project: blink the LED on pin 13. Press Play, change a Wait and watch the Arduino code change with it, add a button, then flip through Logic, Wiring and App. When it works here, the same blocks run on an Uno, Nano or Mega from Chrome or Edge, and pin 13 already has a small LED on the board.
Press Play. No board needed: the simulator runs your blocks right here.
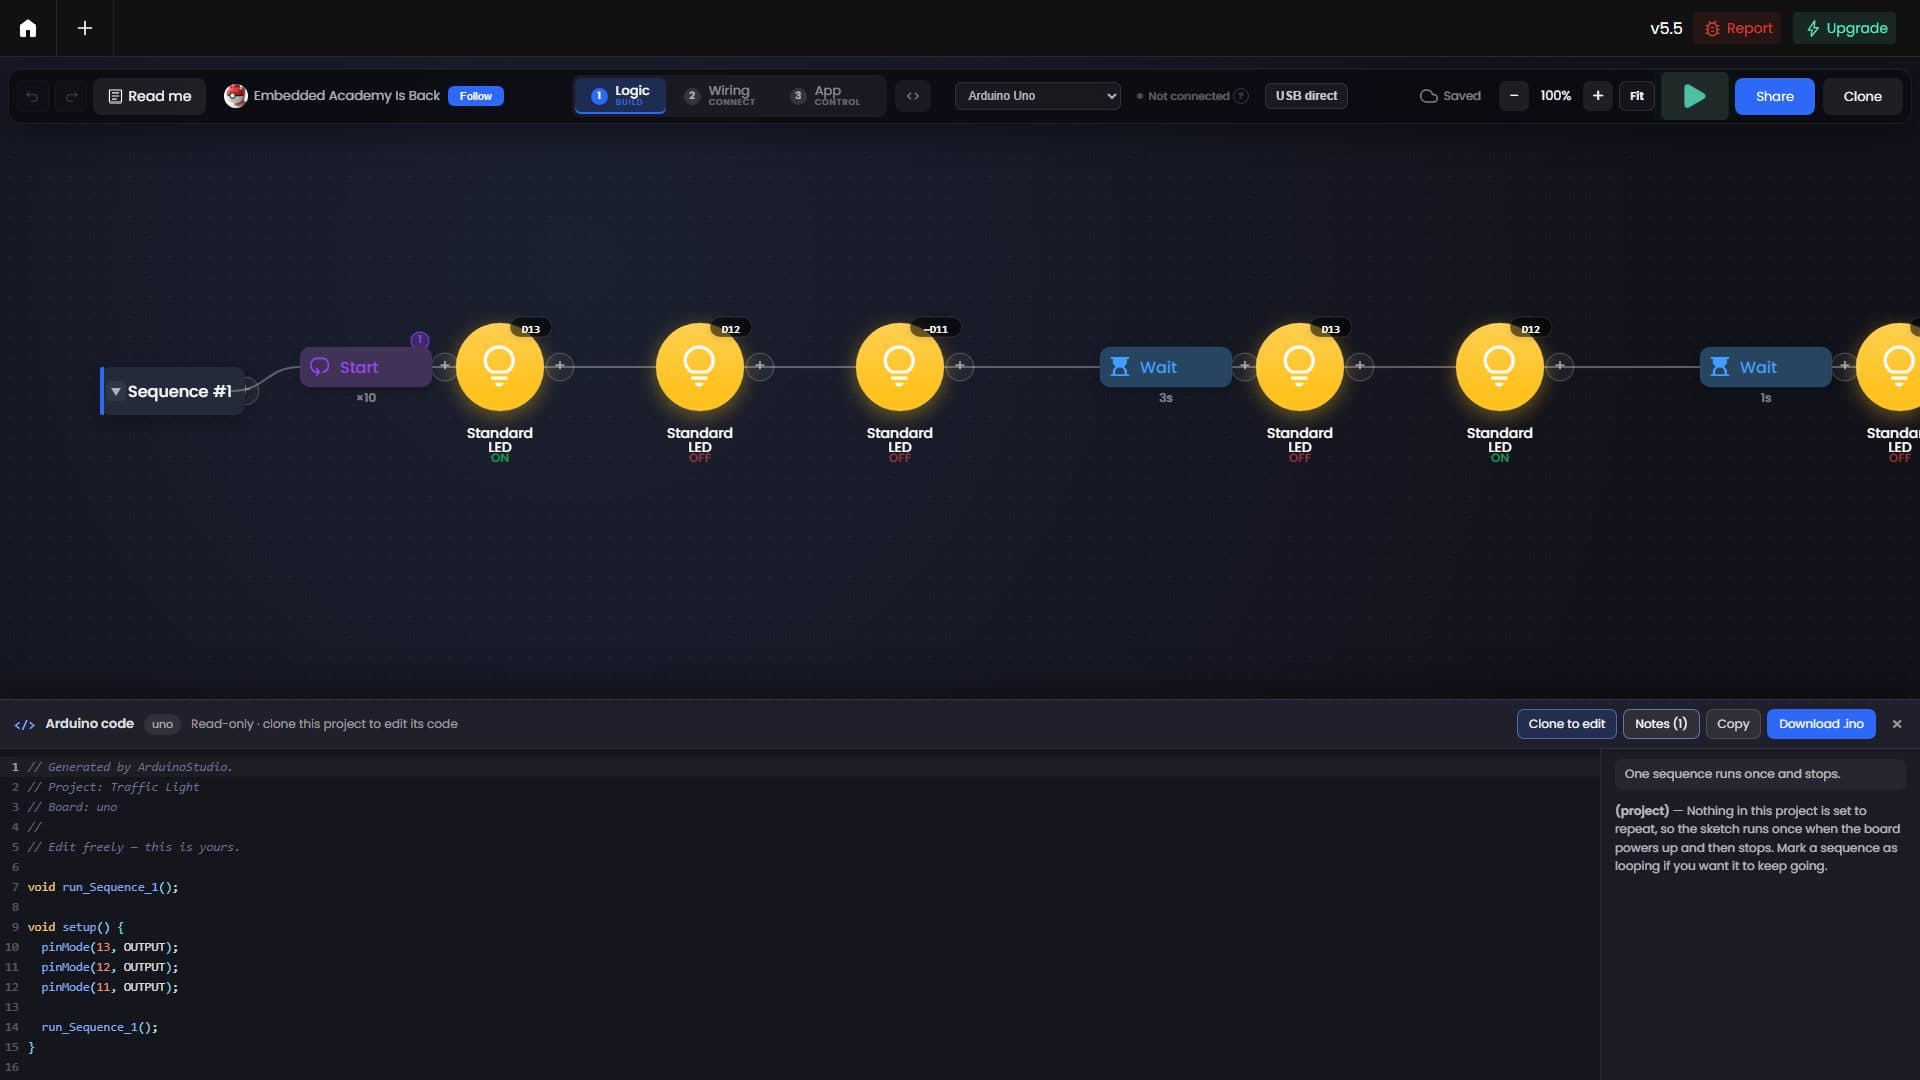
// Generated by ArduinoStudio. // Project: Blink // Board: uno // // Edit freely — this is yours. void run_Sequence_1(); void setup() { pinMode(13, OUTPUT); } void loop() { run_Sequence_1(); } void run_Sequence_1() { digitalWrite(13, HIGH); delay(); digitalWrite(13, LOW); delay(); }
Change a delay here and its Wait block updates. In the editor you can also change pins, HIGH/LOW, loop counts, messages and thresholds, and type new lines like delay(500); to add blocks. Loops and Checks are added on the canvas.
What the same project does on a real Uno.
Pin 13 drives the small LED marked L on the board, so this project needs no extra parts.
It works here. Next, make a real board do it.
Chain blocks into sequences: 21 real parts plus Loop, Check, Wait and Message. Press Play with no board and the simulator runs it: the running block lights up, waits count down, and the Virtual Board shows every pin your project uses, with buttons you can tap and sensor sliders you can drag to test your Checks.
How the simulator works →Your blocks draw their own breadboard diagram, with resistors where they belong, and pin conflicts are flagged before you build. Move a wire and the project changes with it. In the editor, Build it myself walks you through it wire by wire, and EyeBuild checks your real breadboard through your camera. Diagrams are drawn for the Uno, Mega 2560, Nano and ESP32 DevKit.
About the wiring view →Lay out buttons, sliders, indicators, text, shapes, emojis and images, and preview them at phone size. A button runs your sequences on click, double-click or hold. To drive a real board from the panel, the editor uses the desktop Bridge app; over USB direct a press runs the simulator, and indicators and sliders always show the simulator.
About the App stage →Your blocks are a real Arduino sketch that updates on every change. Change a pin or a delay in the code and the block follows; Loops and Checks are added on the canvas. Copy it, or download the .ino and upload it yourself with the Arduino IDE.
ComingDeeper full-code editing.
What syncs →A preview built for this page. It follows the editor’s own run timing, Check rules and Arduino code for these blocks. The editor itself has 25 blocks, the AI Builder, sharing and collaboration.
Fully simulated today: Standard LED, Servo, Button, Photoresistor, Switch and Potentiometer. The rest run partly, or not yet, in the simulator. See where every block runs →
Feature tour
Screenshots from the editor itself. Each one shows a feature, explains how it works and lists what you can do with it. All 27 features →
1 · Logic
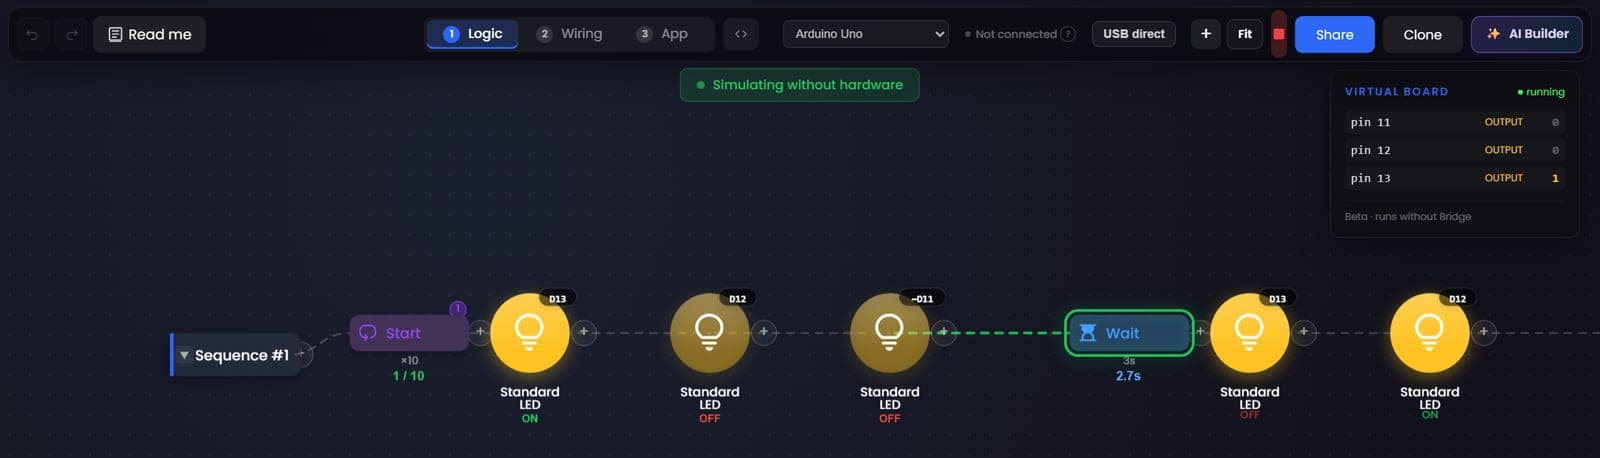
Press Play with no board plugged in and your project runs in the browser. The block that is running lights up, a Wait counts down, a Loop counts its passes, and the Virtual Board panel shows each pin switching on and off. Tap a button or drag a sensor reading on that panel to test a Check.
What you can do
Fully simulated: Standard LED, Servo, Button, Photoresistor, Switch and Potentiometer. Other blocks are limited or don’t simulate yet, and it shows pins, not voltages or current.
Learn more about Simulator →Start
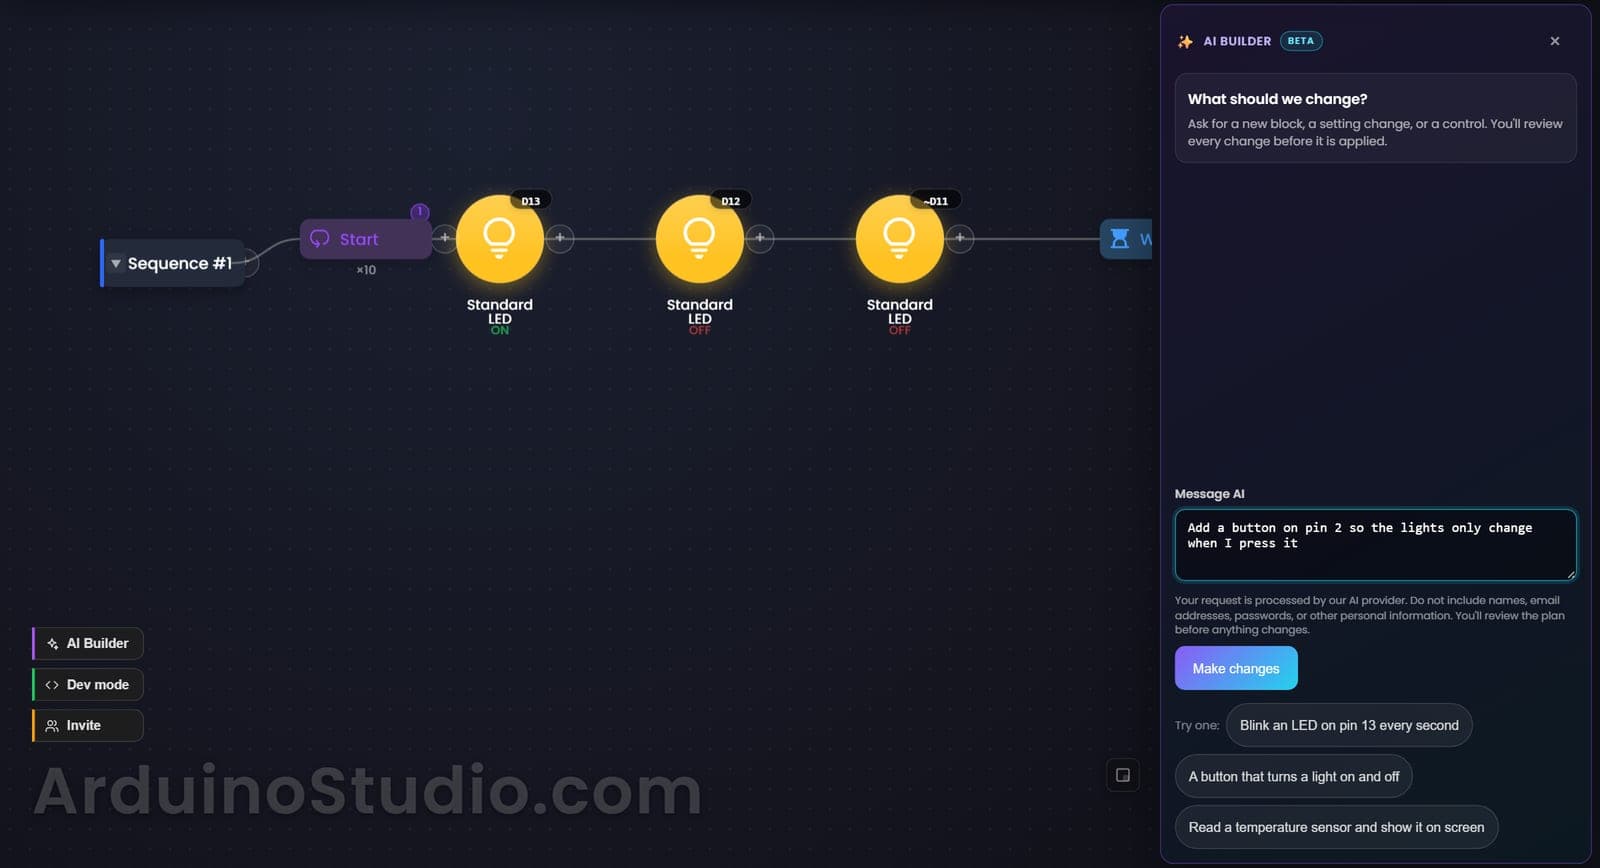
Describe a project in your own words and the AI Builder plans it: the logic blocks and their settings, a control panel and a README. It shows you the plan and changes nothing until you press Apply. On a project you already have, it edits what is there.
What you can do
You need an account. It works from text, and the wiring diagram draws itself from the blocks it places.
Learn more about AI Builder →2 · Wiring
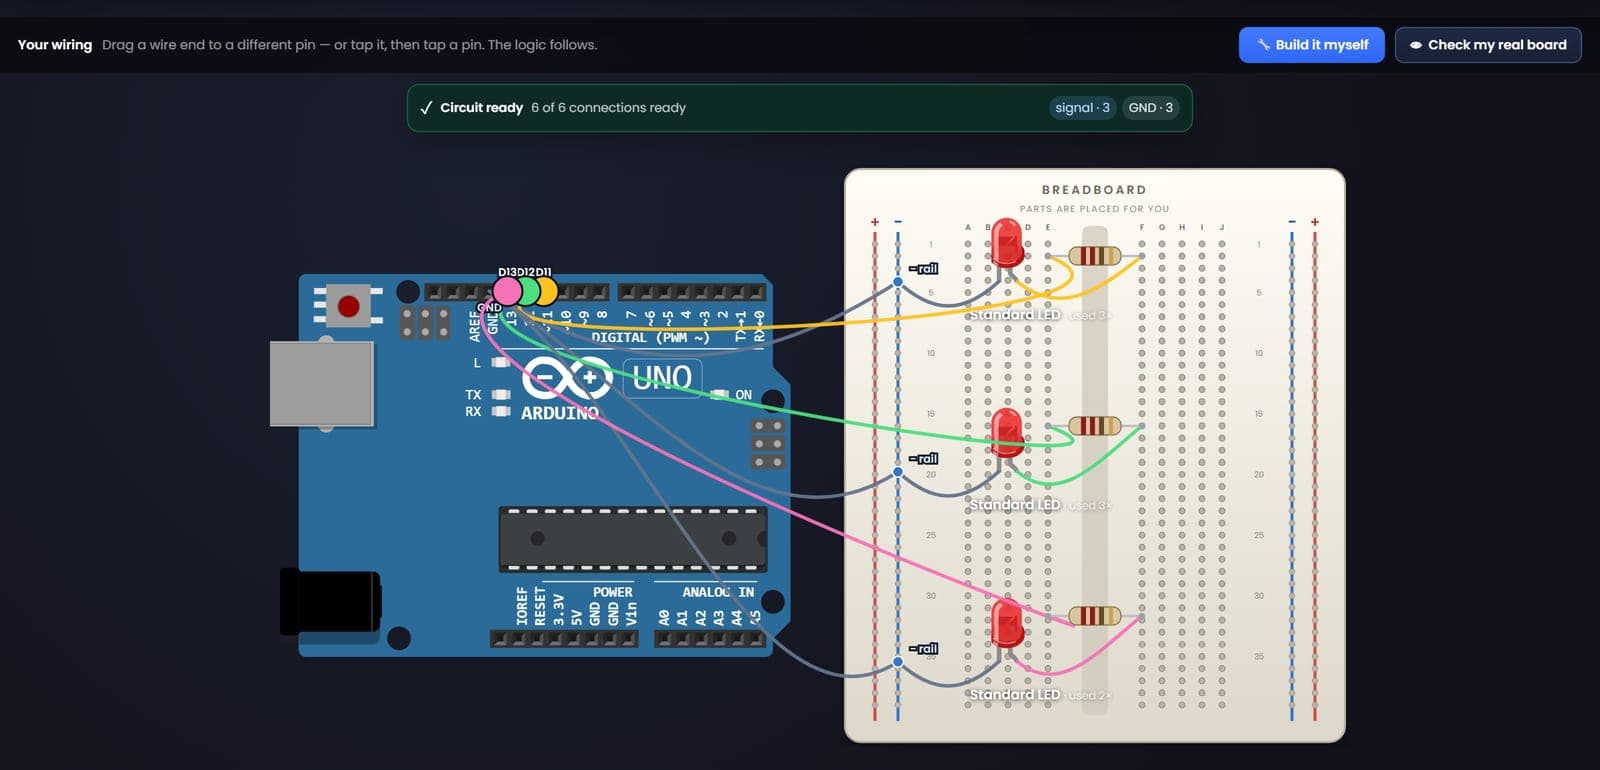
Switch to stage 2 and your blocks draw their own breadboard diagram: the board, the breadboard, every part, and resistors where they belong. It flags pin conflicts and power problems before you build. Drag a wire end to another pin and the block’s pin setting changes with it.
What you can do
Diagrams are drawn for the Uno, Mega 2560, Nano and ESP32 DevKit.
Learn more about Wiring diagram →2 · Wiring
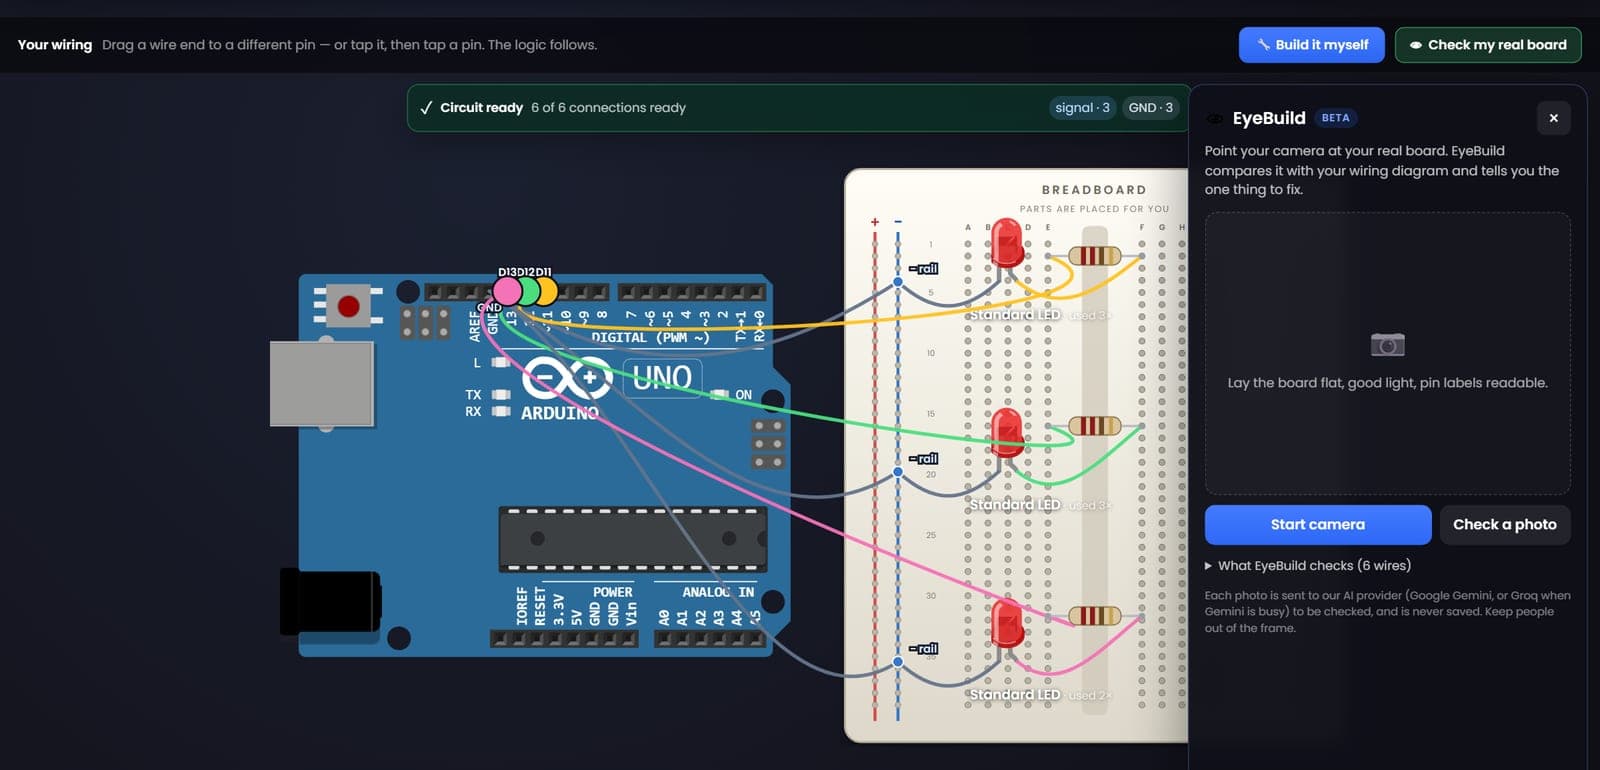
Point your camera at your breadboard, or upload a photo. EyeBuild compares it with your wiring diagram and names the one thing to fix. Turn on Keep watching and it checks again every 10 seconds while you move wires.
What you can do
You need an account, and it works on the boards that have a wiring diagram. Each photo goes to an AI provider to be checked and is never saved.
Learn more about EyeBuild: check your real board →3 · App
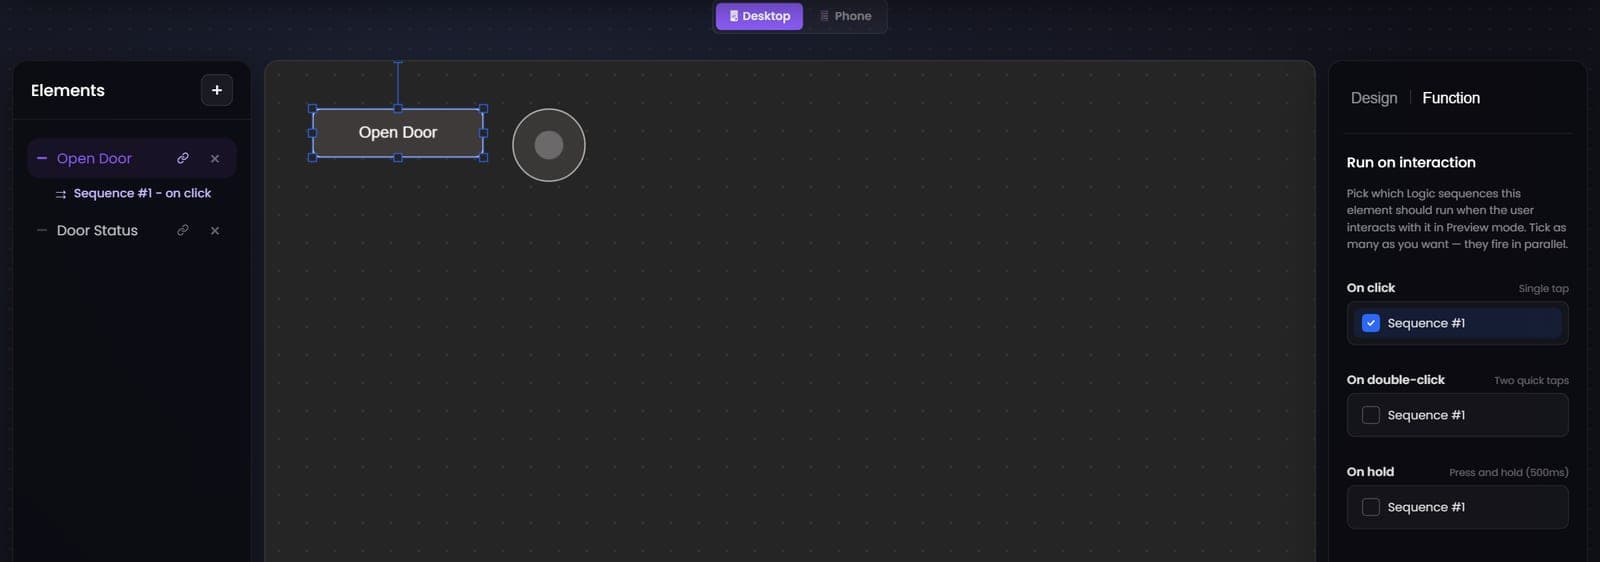
Stage 3 is where you design your own control panel: buttons, sliders, indicators, text, shapes, emojis and images, laid out the way you want. Choose which sequences a button, shape, text or image runs on click, double-click or hold. Preview the panel at desktop or phone size, then press Play to use it.
What you can do
With USB direct, a press runs your sequences in the simulator. To drive a real board from the panel, use the Bridge desktop app.
Learn more about Control panel builder →Arduino code
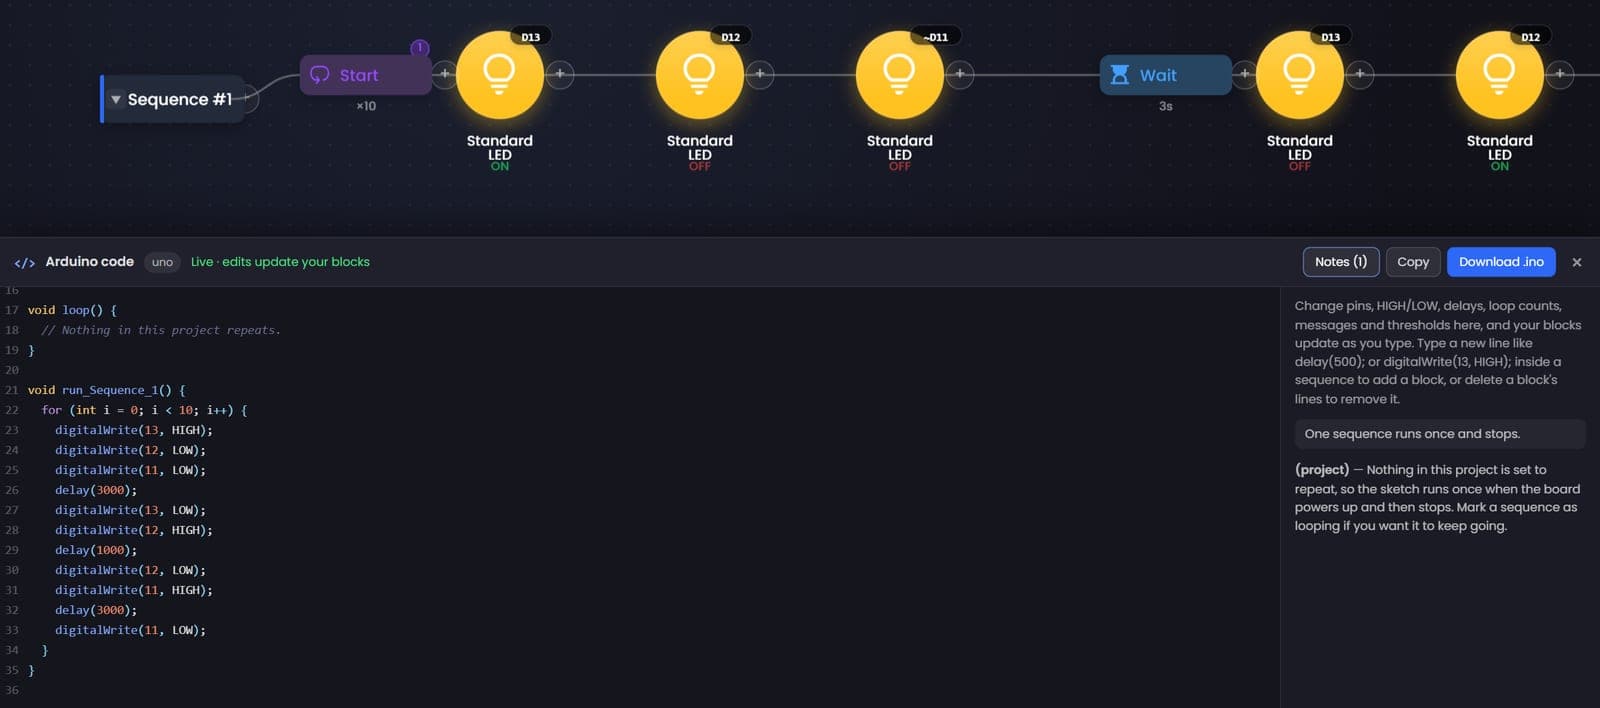
Open the Arduino code view and your blocks become a real Arduino C++ sketch, docked under the canvas and updated on every change. It works the other way too: change a pin, a delay or a loop count in the code and that block updates as you type. Type a new line such as delay(500); and a new block appears.
What you can do
Loops and Checks are still added on the canvas. The app doesn’t upload your sketch; to run the code itself, open the .ino in the Arduino IDE.
Learn more about Edit the code, the blocks follow →Hardware
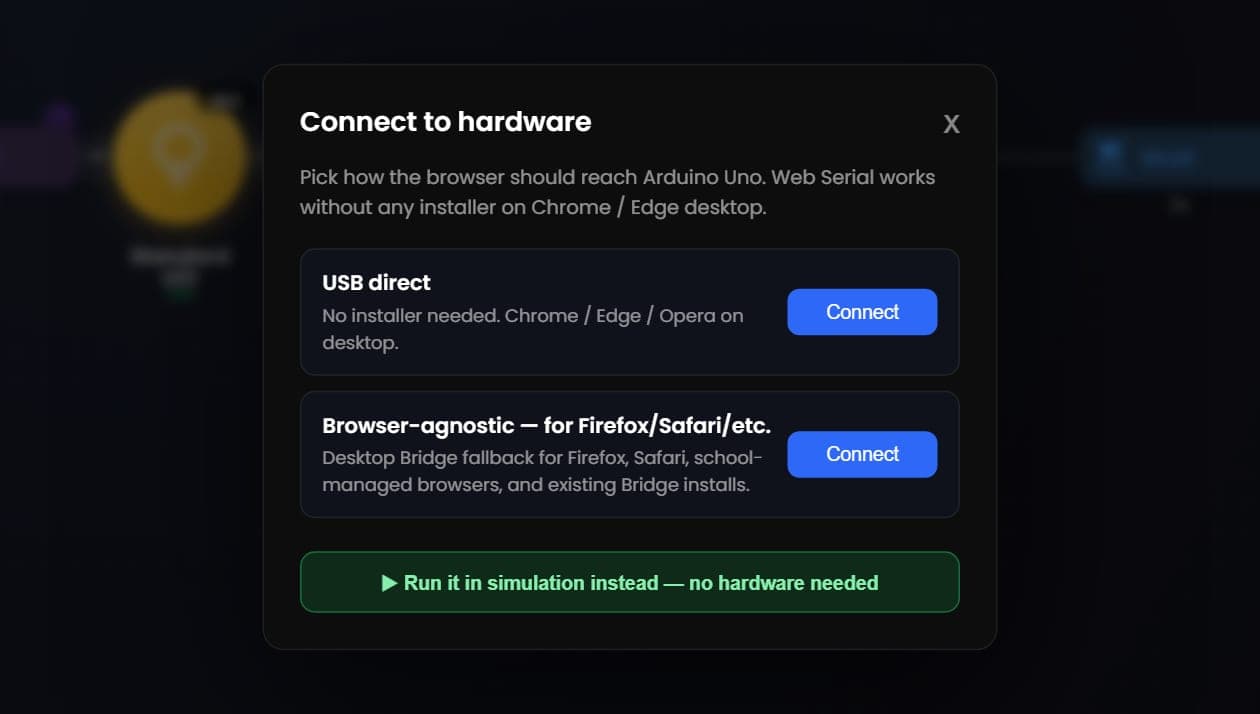
Plug your board into your computer, open the project in Chrome or Edge, and connect with USB direct: the browser drives the board over USB, with nothing to install. If an Uno R3, Nano or Mega 2560 doesn’t have the firmware yet, the setup wizard installs it from the tab. Your project runs on the board while it stays plugged into the open tab.
What you can do
USB direct works on a computer and runs the Standard LED, Servo, Button, Photoresistor, Switch and Potentiometer blocks. For Firefox or Safari, or blocks such as the RGB LED, DC motor and relay, use the Bridge desktop app.
Learn more about USB direct →Together
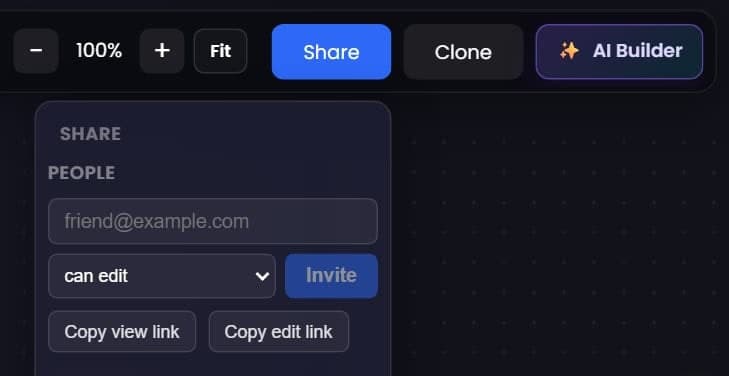
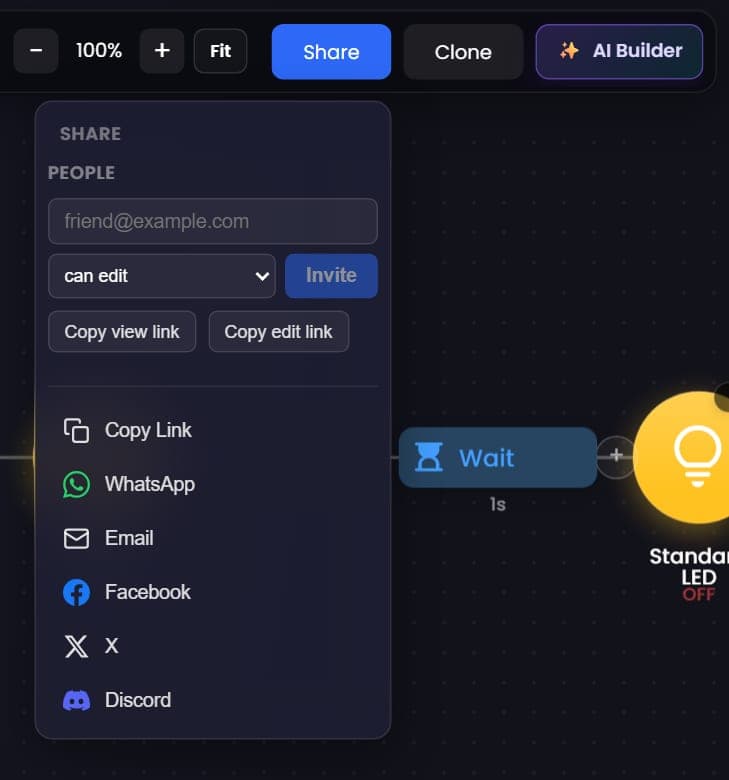
Invite a friend by email, or send an invite link, as an editor or a viewer. The project appears in their Shared with me tab, you see who else has it open, and changes sync every few seconds.
What you can do
Joining needs an account. There are no live cursors, so take turns on the same block.
Learn more about Build it together →Real projects, real hardware — each one buildable today. Tap one and the AI assembles it in front of you; every block stays yours to change.
A light that flashes S-O-S, forever, the moment power arrives.
Turns itself on when the room gets dark. No switch, no app.
Press the button and a real motor swings the gate open, waits, and closes it.
Green, yellow, red — a real intersection cycle you control.
The light snaps on — how fast can your friend hit the button?
A servo that swings from side to side and back, over and over.
Every public project is a link that starts running the moment it opens, and it sits on your public profile.

Send a link and your project starts running in the simulator as soon as it opens. No account needed to watch it run.

Anyone with an account can clone a public project into their own projects, change it and make it theirs.

Invite a friend by email or with a link, as an editor or a viewer. The project lands in their Shared with me tab, you see who else has it open, and changes sync every few seconds. There are no live cursors, so take turns on the same block.

Every maker gets a public profile with their public projects. Follow makers, like projects, and browse a community feed of projects that run.
Meet makers with recently updated public projects. Explore a portfolio to see what they are building.


